Rapid Prototyping 1st Module
Introduction
One of the important steps prior to the production of a functional product is building of a physical prototype. Prototype is a working model created in order to test various aspects of a design, illustrate ideas or features and gather early user feed-back. Traditional prototyping is typically done in a machine shop where most of parts are machined on lathes and milling machines.
This is a subtractive process, beginning with a solid piece of stock and the machinist carefully removes the material until the desired geometry is achieved. For complex part geometries, this is an exhaustive, time consuming, and expensive process.
A host of new shaping techniques, usually put under the title Rapid Prototyping, are being developed as an alternative to subtractive processes. These methods are unique in that they add and bond materials in layers to form objects. These systems are also known by the names additive fabrication, three dimensional printing, solid freeform fabrication (SFF), layered manufacturing etc.
These additive technologies offer significant advantages in many applications compared to classical subtractive fabrication methods like formation of an object with any geometric complexity or intricacy without the need for elaborate machine setup or final assembly in very short time.
This has resulted in their wide use by engineers as a way to reduce time to market in manufacturing, to better understand and communicate product designs, and to make rapid tooling to manufacture those products. Surgeons, architects, artists and individuals from many other disciplines also routinely use this technology.
Prototype: It is a model fabricated to prove out a concept or an idea.
Solid Modelling: It's a branch of CAD that produces 2D or 3D objects in an electronic format.
Definitions: Rapid prototyping is basically an additive manufacturing process used to quickly fabricate a model of a part using 3-D CAM data.
It can also be defined as layer by layer fabrication of 3D physical models directly from CAD.
Need for the compression in product development
• To increase effective communication.
• To decrease development time.
• To decrease costly mistakes.
• To minimize sustaining engineering changes.
• To extend product life time by adding necessary features & eliminating redundant features early in the design.
Trends in manufacturing industries emphasis the followings:
• Increasing the no of variants of products.
• Increase in product complexity.
• Decrease ir product lifetime before obsolescence.
• Decrease in delivery time.
• Product development by Rapid prototyping by enabling better communication.
Conventional Machining:
• Its not suitable for complex shapes because they are difficult to machine.
• Time consuming
• Very costly
• Tedious or very laborious.
• Skilled operator is required.
• Accuracy will be less.
• Increased product development time.
Pre-processing:- CAD model slicing & setting algorithms applied for various RP systems.
Post-processing:- Cleaning operations required to finish a part after removing it from RP machine.
Materials for Rapid Prototyping- Paper, Wax, Plastics, Resins, Metallic powders.
Methodology of Rapid Prototyping:
RP in its basic form can be described as the production of three dimensional (3D) parts from computer aided design (CAD) data in a decreased time scale. The basic methodology of all RP process can be summarized as shown in following figure.

• Construct a CAD model.
• Convert it to STL format.
• RP machine processes .STL file by creating sliced layers of model.
• First layer of model is created.
• Model is then lowered by thickness of next layer.
• Process is repeated until completion of model
• The model & any supports are removed.
• Surface of the model is then finished and cleaned.
(1) Development of a CAD model
The process begins with the generation CAD model of the desired object which can be done by one of the following ways;
• Conversion of an existing two dimensional (2D) drawing
• Importing scanned point data into a CAD package
• Creating a new part in CAD in various solid modeling packages
• Altering an existing CAD model
RP has traditionally been associated with solid rather than surface modelling but the more recent trends for organic shapes in product design is increasing the need for free flowing surfaces generated better in surface modelling.
(2) Generation of Standard triangulation language (STL) file
The developed 3D CAD model is tessellated and converted into STL files that are required for RP processes. Tessellation is piecewise approximation of surfaces of 3D CAD model using series of triangles. Size of triangles depends on the chordal error or maximum fact deviation.
For better approximation of surface and smaller chordal error, small size triangle are used which increase the STL file size. This tessellated CAD data generally carry defects like gaps, overlaps, degenerate facets etc which may necessitate the repair software. These defects are shown in figure below. The STL file connects the surface of the model in an array of triangles and consists of the X, Y and Z coordinates of the three vertices of each surface triangle, as well as an index that describes the orientation of the surface normal.
(3) Slicing the STL File
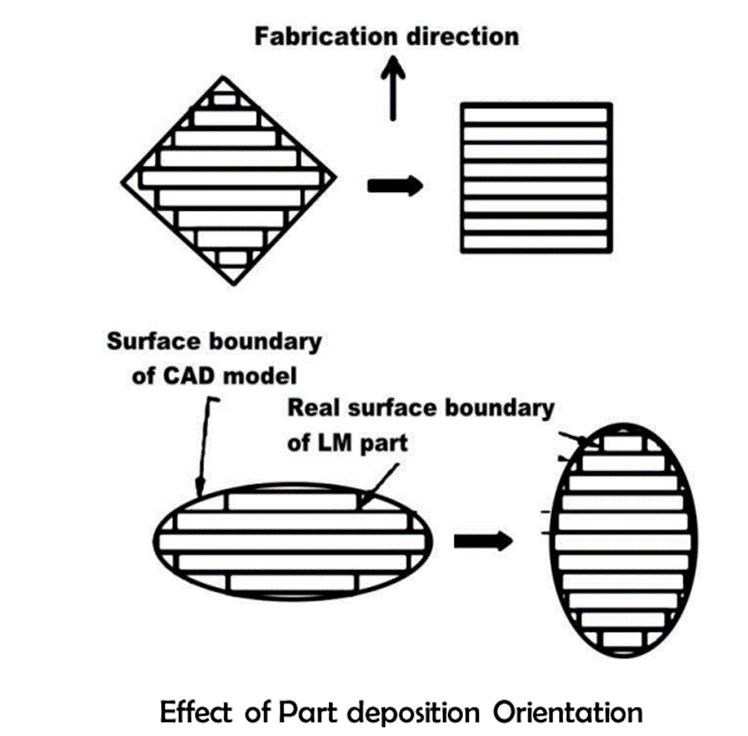
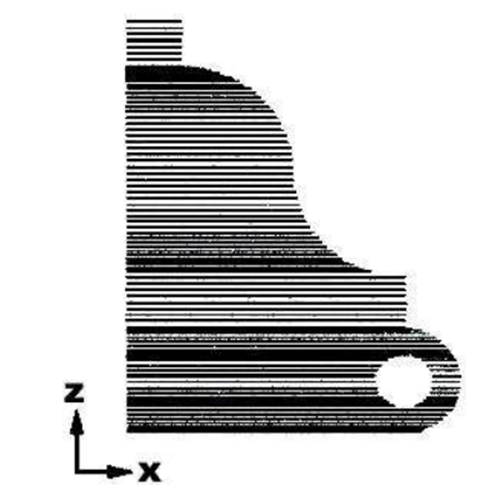
Slicing is defined as the creating contours of sections of the geometry at various heights in the multiples of layer thickness. Once the STL file has been generated from the original CAD data the next step is to slice the object to create a slice file (SLI). This necessitates the decision regarding part deposition orientation and then the tessellated model is sliced. Part orientation will be showing considerable effect on the surface as shown in the figures.

The thickness of slices is governed by layer thickness that the machine will be building in, the thicker the layer the larger the steps on the surface of the model when it has been built. After the STL file has been sliced to create the SLI files they are merged into a final build file. This information is saved in standard formats like SLC or CLI (Common Layer Interface) etc.

(4) Support Structures
As the parts are going to be built in layers, and there may be areas that could float away or of overhang which could distort. Therefore, some processes require a base and support structures to be added to the file which are built as part of the model and later removed.
(5) Manufacturing
As discussed previously, the RP process is additive i.e. it builds the parts up in layers of material from the bottom. Each layer is automatically bonded to the layer below and the process is repeated until the part is built. This process of bonding is undertaken in different ways for the various materials that are being used but includes the use of Ultraviolet (UV) lasers, Carbon Dioxide (COz) lasers, heat sensitive glues and melting the material itself etc
(6) Post Processing
The parts are removed from the machine and post processing operations are performed sometimes to add extra strength to the part by filling process voids or finish the curing of a part or to hand finish the parts to the desired level. The level of post processing will depend greatly on the final requirements of the parts produced, for example, metal tooling for injection molding will require extensive finishing to eject the parts but a prototype part manufactured to see if it will physically fit in a space will require little or no post processing.
History of RP systems
• It started in 1980's
• First technique is Stereo lithography (SLA)
• It was developed by 3D systems of Valencia in California, USA in 1986.
• Fused deposition modeling (FDM) developed by stratasys company in 1988.
• Laminated object manufacturing (LOM) developed by Helisis (USA).
• Solid ground Curing developed by Cubitol corporation of Israel.
• Selective laser sintering developed by DTM of Austin, Texas (USA) in 1989.
• Sanders Model maker developed by Wilton incorporation USA in 1990.
• Multi Jet Modeling by 3D systems.
• 3-D Printing by Solygen incorporation, MIT, USA.
Classification of RP systems.

Rapid Prototyping technologies are classified based on the initial form of its material i.e., the base material of prototype or part to be built. Thus, rapid prototyping technologies are classified into 3 categories
Solid Based Rapid Prototyping System Solid based rapid prototyping systems are meant to encompass all the forms of materials in solid state. The solid form can include the shape in the form of a wire, laminate, pellets or a roll. Solid-based rapid prototyping systems works on the following principles:
(i.) Cutting and Glueing / Joining method.
(ii). Melting and Solidifying / Fusing method.
These processes are different from one another, though some of them use the laser in the process of fabricating prototypes. They all utilize solid in one form or the other, as the primary medium to create a prototype.
Liquid Based Rapid Prototyping System
Liquid based rapid prototyping systems have the initial form of its material in liquid state. The base material can include a resin or a polymer. Liquid based rapid prototyping systems works on the principle of ‘Photo curing’ under which three methods are possible
i. Single laser beam method
ii. Masked lamp method
iii. Two laser beam method
Most of these systems build parts in a vat of photo-curable resin, an organic resin that solidifies under the exposure to laser radiation, in UV range. The laser cures the resin near the surface, forming a hardened layer.
The formed layer is lowered by an elevation control system to allow the next layer of resin to be similarly formed over it. This continues until the entire part is completed. Under liquid based rapid Prototyping system, stereo lithography is very unique and patented process which combines CAD, CAM, CAE, Laser Scanning, Optical Scanning technologies including chemistry to fabricate 3D solid models from 3D CAD data
Powder Based Rapid Prototyping System
Powder particles are by-and-large to the particles of solid state in a strict context. However, intentionally it is categorized outside the solid-based rapid prototyping systems to refer powder in grain form. All the powder based rapid prototyping systems works on the principle of Joining/Binding.
The method of joining / binding differs for all the systems, in that some employ a laser while others use a binder/glue to achieve the joining effect. Binder material is deposited on to selected regions of layer of powder particles to produce a layer of powder particles that are completely bonded at the selected regions.
Iterations would fabricate the desired part. Post-processing is highly required to remove the unbonded powder particles
Application of Rapid Prototyping –
·Medical Applications: Rapid Prototyping is used to build solid replicas of all human organs and parts. Components like stretchers, broken limbs, prosthetics, etc., are majorly fabricated for bio-medical applications. The process involves the conversion of medical images to .STL files. The accuracy of reproduction of plastic models was notably superior.
·Design Applications: Parts fabricated by Rapid Prototyping method helps in design visualization, concept understanding and visual verification of the end part or the product.
·Engineering Applications: The Rapid prototyping systems helps in fabricating parts to required scales, to determine form and fit sizes, prototypes to perform flow analysis in various fields such as aerospace, automotive, bio-medical , ship-building industries. Due to various potential benefits in the rapid prototyping and 3D printing processes in membrane manufacturing, the use of the process of rapid prototyping in membrane engineering systems shows significant application.
·Aerospace And Automotive Applications: The rapid prototyping process has wide applications in aerospace and automotive fields; for design, visual verification, assembly, form, fit, limits, tolerances, clearances, inspection, testing, prosthetics, 3D casts, Metal casting etc.,
·Manufacturing Applications: Tools and parts such as moulds, castings-metal or sand, master pattern making using materials such as resins, rubbers, metals and ceramics etc., can be fabricated for their respective applications. Wind tunnel model components can be fabricated for its applications i.e., lightly loaded wind tunnel model components, also investment casting using rapid prototyping for pattern development offers strength and high production.
In addition to the above applications, rapid prototyping process shows its technological growth in textile industry, furniture design, electrical appliances, and architectural interior design and design of special and complicated contour objects.
Thus, the technology has been developing rapidly from past few decades, indicating a greater potential for further development and its applications in various disciplines. Also, the part fabricated from a technological concept, would develop valuable manufacturing trifecta along the traditional equivalent and subtractive manufacturing processes
Stereo Lithography Systems:
Introduction
it is the first RP system developed by 3D SYSTEMS of Valencia in California, USA in 1996.
First Model developed was 250/50 followed by 250/30, 3500, 5000 and 7000.
Principle
SLA is a laser based Rapid Prototyping process which builds parts directly from CAD by curing or hardening a photosensitive resin with a relatively low power laser
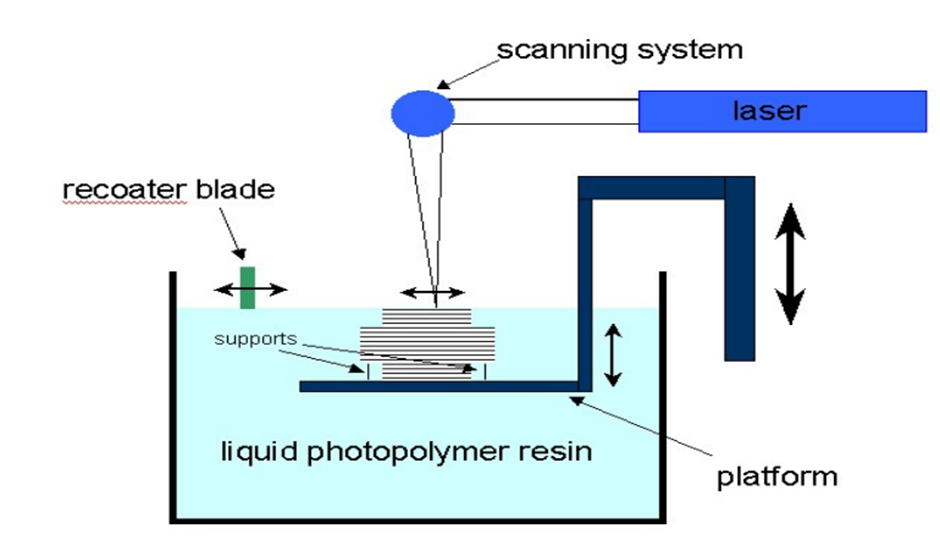
StereoLithography (SL) is the best known rapid prototyping system. The technique builds three-dimensional models from liquid photosensitive polymers that solidify when exposed to laser beam. The model is built upon a platform in a vat of photo sensitive liquid.
A focused UV laser traces out the first layer, solidifying the model cross section while leaving excess areas liquid. In the next step, an elevator lowers the platform into the liquid polymer by an amount equal to layer thickness. A sweeper recoats the solidified layer with liquid, and the laser traces the second layer on the first. This process is repeated until the prototype is complete.
Afterwards, the solid part is removed from the vat and rinsed clean of excess liquid. Supports are broken off and the model is then placed in an ultraviolet oven for complete curing.
Parameters:
Laser Type: Helium Cadmium Laser (He-Cd)
Laser Power: 24mW
Laser Life: 2000 hours
Re-coat material: Zaphir
Minimum Slice Thickness: 0.1mm
Beam Diameter: 0.2mm
Scan Speed: 0.75m/sec
Maximum Part Volume: 0.25x0.25x0.25 m
Maximum Part Weight: 9Kgs
Application Range
• Processing large variety of photo-sensitive polymers including clear, water resistant and flexible resins
• Functional parts for tests
• Tools for pre series production tests.
• Manufacturing of medical models
• Manufacturing of electro-forms for Electro Discharge Machining
(EDM)
• Form-fit functions for assembly tests.
Advantages
• Possibility of manufacturing parts which are in possible to produce conventionally using a single process.
• Continuous unattended operation for 24 hours.
• High resolution.
• Any geometrical shape can be made with virtually no limitation.
Disadvantages
• Necessity to have support structures
• Accuracy not in the range of mechanical part manufacturing.
• Restricted areas of application due to given material properties.
• Labour requirements for post processing, especially cleaning.
Software:
(i) SLA CONTROL AND SET UP SOFTWARE: It operates on SLA 250 and SLA 500 machines. It has got three packages.
a) SLA VIEW: UNIX based system for viewing and positioning.
b) BRIDGE WORKS: UNIX based software for generating support structures.
c) SLA SLICE: Slicing and system operation software.
ii.MAESTRO: UNIX based software
iii.MS WINDOWS NT SOFTWARE (3D LIGHT YEAR), It is used for viewing, positioning, support generation and slicing, build station for operating SLA machine.
Build Materials Used:
Epoxy Resin, Acrylate Resin
Epoxy Resin has better material properties and less hazardous but require large exposure time for curing.
SLA HARDWARE.
The build chamber of SLA contains
1) A removable VAT that holds the build resin.
2) A detachable perforated build platen on a Z axis elevator frame
3) An automated resin level checking apparatus
4) VAT has a small amount of Z movement capability which allows computer to maintain a exact height per layer.
5) A recoated blade rides along the track at the ton of the rack and serves to smooth the liquid across the part surface to prevent any rounding off edges due to cohesion effects.
6) Some systems have Zaphyr recoater blade which actually softens up resin and delivers it evenly across the part surface.
7) Behind the build chamber resides the laser and optics required to cure resin.
8) Laser unit is long rectangular about 4 feet long and remains stationary.
Post Processing:
1) Ultraviolet Oven (Post Curing Apparatus) 2) An alcohol Bath
Clean the part in the alcohol bath and then go for final curing


